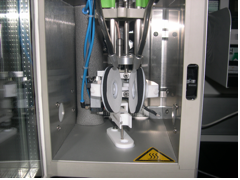
Using the Vitrobot (MkII)
Entered On
Type of Procedure
Short Description
Scope
This protocol covers basic operating instructions for the Vitrobot. It is recommended that safety glasses and appropriate footwear be worn when using this instrument to protect against liquid nitrogen splashes.
Procedure
- Open nitrogen tank stem valve. The needle valve should be set above 600 kPA to provide sufficient line pressure for the Vitrobot.
- Open the chamber and install fresh blotting pads. The simplest way is to step through the plunging cycle until the tweezer rod is all the way up (click on Place New Grid, then Continue one time).
Fresh pads (and other accessories) can be found in the drawer marked “Vitrobot”. Gently loosen the white plastic retaining rings to remove the old pads. New pads can be inserted and held in place by reinserting the retaining rings by hand.
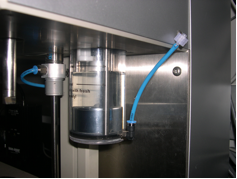
- Fill humidifier reservoir with tap water, using a syringe and the luer-lock port on the blue tubing. Make sure the tubing is in the up position or the water will drain out.
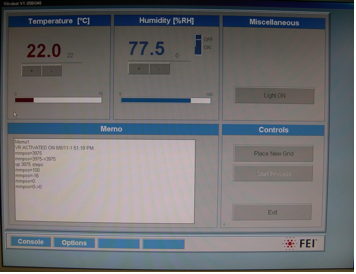
- Set the desired temperature and RH working conditions with the mouse and keypad.
- Set the desired plunging conditions:
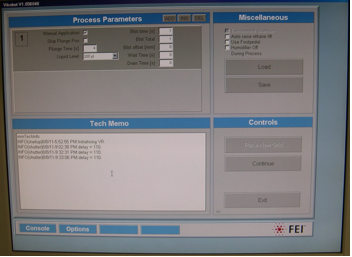
ADD – allows you to create a multi-step plunging process. For example, you may ish to have multiple applications of sample followed by blotting. This button adds additional steps.
INS – this button inserts an additional step into an existing multi-step protocol
DEL – this button deletes a step from an existing multi-step protocol.
Manual Application – this box should be checked if you wish to apply the sample yourself. The alternative is the automatic application of sample by dipping the grid into a 1.5ml microfuge tube containing your sample solution.
Skip Plunge position – when this box is check the grid is not lowered to the sample application position, regardless of whether the Manual Application box is checked or not.
Plunge Time (s) – this is the amount of time the grid spends in the sample solution for an Automatic Application.
Liquid Level – this is the approximate amount of sample solution in the 1.5ml microfuge tube used for Automatic Application.
Blot Time (s) – this is the duration of each blot.
Blot Total – this parameter allows multiple, immediately sequential blots. If each blot is to be of the same duration, you can set this number >1. If you want blots of varying duration or with a rest time in between blots, add another blotting cycle.
Blot Offset (mm) – this is the vertical distance offset for the grid before the blot is applied. A negative number moves the grid down, a positive number moves it up. This location will change the grid’s position n the wedge, affecting the gradient in ice thickness. The maximum value allowed in this parameter is +2mm, the minimum is -6mm.
Wait Time (s) – this is the time the loaded grid is held in the humidity chamber before blotting.
Drain Time (s) – this is the time the blotted grid is held in the humidity chamber before plunging.
- Fill the outer reservoir with liquid nitrogen. You may also wish to cool the inner chamber with nitrogen to reduce the time until stability is achieved, or you can just wait. The spider should be in for this cooling.
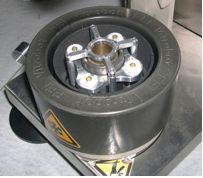
- Once the chamber has reached a stable temperature, liquify the ethane in the inner chamber as usual. When the ethane begins to crust over, you can remove the spider to reduce the rate of heat transfer from the ethane into the LN2. If you feel the ethane has begun to warm, you can reinsert the spider. This is the only ethane temperature control available for this instrument.
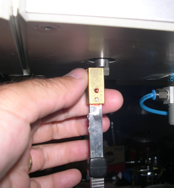
- Load a grid into the tweezers. Orient the desired loading surface either to the left or right, depending on how you want to load your sample.
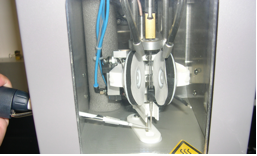
- Click on Place New Grid to draw up the tweezer rod and slide the vitrobot tweezers onto the notched end of the rod.
- Click on Continue and wait for the tweezers and cryogen cup to be drawn up. Use caution as the LN2 may splatter if the container is full.
- Click Start Process to lower the grid into the loading position. Open the left or right window and load the grid.
- Click on Continue to plunge the grid using the parameters defined in step 5.
- When the grid and cup are in the down position, remove the tweezers and transfer the grid to the box. The exact method of transference is left as an exercise for the operator.
- When you are done plunging, cleanup consists of removing the LN2 cup to the hood for evaporation, putting away the tweezers and general cleanup of the workspace, and draining the humidifier cup. To do this, simply rotate the blue tube downward into a beaker and let the water drain by gravity. There is no need to change pads. You can save the plunging conditions if desired in the default directory (C:\My Documents).
